
Actors
Actors are prebuilt Excalibur Entities that come with the batteries included for most applications. Like position, velocity, graphics, and collision detection.
Actors are the recommended way to use Excalibur, they are the primary way to show something on the screen.
If you don't want these built-ins and you want to build only what you want, read about entities here
Basic actors
For quick and dirty games, you can just create an instance of an Actor and manipulate it directly.
Actors (and other entities) must be added to a Scene to be drawn and updated on-screen.
const player = new ex.Actor({
    name: 'player', // optionally assign a name
    width: 50,
    height: 50,
    color: ex.Color.Red
});

// move the player
player.vel.x = 15

// add player to the current scene
game.add(player)
game.add is a convenience method for adding an actor to the current scene. The equivalent verbose call is game.currentScene.add.
Custom actors
For "real-world" games, it is common to extend the Actor class.
This gives you much greater control and encapsulates logic for that
actor. This is optional, but is nice for encapsulating your specifics.
class Player extends ex.Actor {
  public health: number = 100
  public ammo: number = 20

  constructor() {
    super({ x: 10, y: 10 })
  }

  shoot() {
    if (this.ammo < 1) {
      return
    }

    this.ammo -= 1
  }
}
Custom actors make it easier to hook into the actor lifecycle and encapsulate the actor's state better than a basic actor.
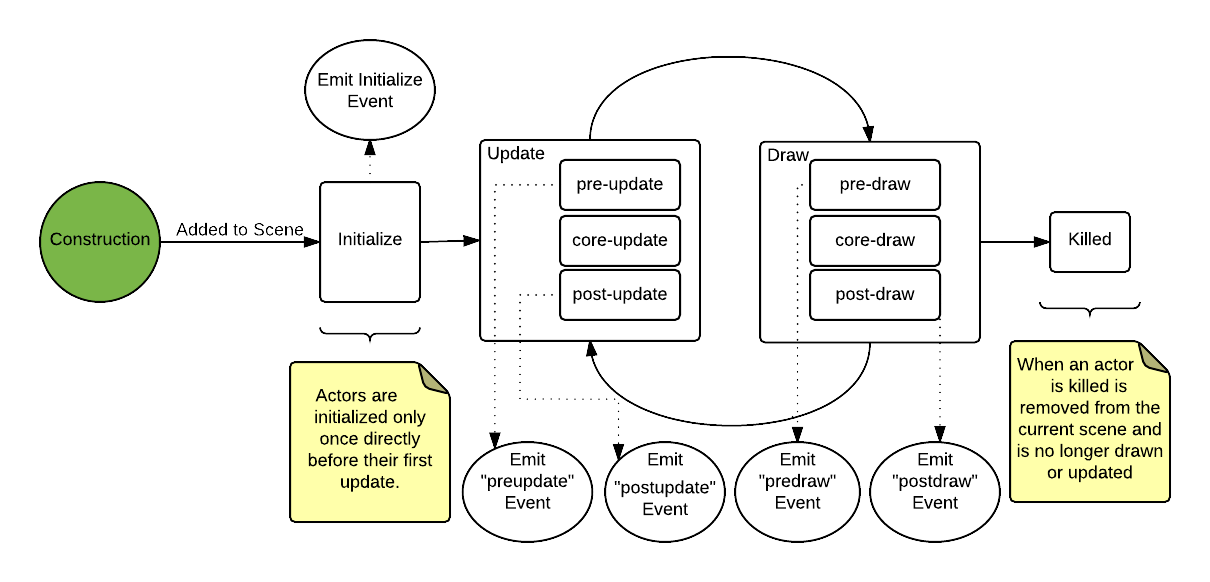
Actor lifecycle
An actor has a basic lifecycle that dictates how it is initialized, updated, and drawn. Once an actor is part of a scene, it will follow this lifecycle.
Updating actors
In most games, things are happening on screen: the background is parallaxing, your hero responds to input, or enemies shoot bullets. In Excalibur, the logic that updates game state is run during the update loop. Actors are a way to encapsulate that logic, such as a Player or Enemy or MenuButton. Actors can be pretty much anything!
Initialization
You should override the Actor.onInitialize method to perform any startup logic
for an actor (such as configuring state). onInitialize gets called
once before the first frame an actor is drawn/updated. It is passed
an instance of Engine to access global state or perform coordinate math.
class Player extends ex.Actor {
  public level = 1
  public endurance = 0
  public fortitude = 0

  constructor() {
    super({ x: 50, y: 50 })
  }

  public onInitialize(engine: ex.Engine) {
    this.endurance = 20
    this.fortitude = 16
  }

  public getMaxHealth() {
    return 0.4 * this.endurance + 0.9 * this.fortitude + this.level * 1.2
  }
}
There are three ways to hook into the update loop of an actor: Actor.onPreUpdate, Actor.update and Actor.onPostUpdate. Actors (and other entities in Excalibur) all have "core" logic that runs in the update or draw loop. The pre- and post-method hooks allow you to choose when you want to run logic in each phase. Normally you will run logic in the "post" hook but sometimes you may want to completely override the core logic or run logic that uses state that was updated before the core logic runs.
All update methods are passed an instance of the Excalibur engine, which
can be used to perform coordinate math or access global state. It is also
passed delta which is the time in milliseconds since the last frame, which can be used
to perform time-based movement or time-based math (such as a timer).
Update
You can override the core Actor.update but it is important to call the super.update(...) method in order to preserve the Excalibur core update implementation.
class Player extends Actor {
  public update(engine: Engine, delta: number) {
    // Custom update here
    super.update(engine, delta)
    // Custom update here
  }
}Pre-update
Override the Actor.onPreUpdate method to update the state of your actor before Actor.update.
class Player extends Actor {
  /**
   * Runs before "core" update logic, before this frame is updated
   */
  public onPreUpdate(engine: ex.Engine, delta: number) {
    // update velocity
    this.vel.setTo(-1, 0)
  }
}
Post-update
Actor.onPostUpdate is called after Actor.update to prepare state for the next frame. Things that need to be updated include state, drawing, or position.
class Player extends Actor {
  /**
   * RECOMMENDED: Runs after "core" update logic, before the next frame.
   * Usually this is what you want!
   */
  public onPostUpdate(engine: ex.Engine, delta: number) {
    // check if player died
    if (this.health <= 0) {
      this.kill()
      return
    }
  }
}
Actor Graphics
Actors by default have no associated graphics, meaning that they will be rendered without any graphics unless you've assigned a default Actor.color.
If an actor has a color set, it will draw a box or circle in that color, if width/height or radius is set.
This can be useful at the beginning of development when you're just tinkering but for most games you might want to add sprites, animations, and other drawings over simple shapes.
Working with Images & Sprites
Think of an ImageSource as the raw image file that will be loaded into Excalibur from a url.
In order for it to be drawn it must be converted to a Sprite.
const image = new ex.ImageSource('./path/to/image.png')
const sprite = image.toSprite()

actor.graphics.use(sprite)
A common pattern is to define graphics in the onInitialize
const image = new ex.ImageSource('./path/to/player.png')

class Player extends ex.Actor {
  public onInitialize(engine: ex.Engine) {
    // set as the "default" drawing
    this.graphics.use(image.toSprite())
  }
}
Drawing hooks
Like the update loop, the draw loop has hooks you can override to perform custom drawing.
For drawing hooks the ExcaliburGraphicsContext is replacing the browser CanvasRenderingContext2D. But if you need to do some custom drawing using the CanvasRenderingContext2D the new Canvas graphic has your back.
const canvas = new ex.Canvas({
  cache: true, // If true draw once until flagged dirty again, otherwise draw every time
  draw: (ctx: CanvasRenderingContext2D) => {
    ctx.fillStyle = 'red'
    ctx.fillRect(0, 0, 200, 200)
  },
})

actor.graphics.use(canvas)
Override the Actor.graphics.onPreDraw or Actor.graphics.onPostDraw methods to customize the draw logic at different points in the loop.
Pre-draw
Actor.graphics.onPreDraw is run before the core draw logic to prepare the frame.
class Player extends ex.Actor {
  constructor() {
    /**
     * ADVANCED: This is run before Actor.graphics.onPreDraw core logic.
     */
    this.graphics.onPreDraw = (
      ctx: ExcaliburGraphicsContext,
      delta: number
    ) => {
      // custom drawing
    }
  }
}
Post-draw
Actor.graphics.onPostDraw is run after the core draw and will draw in the current frame.
class Player extends ex.Actor {
  constructor() {
    /**
     * ADVANCED: This is run before Actor.graphics.onPreDraw core logic.
     */
    this.graphics.onPostDraw = (
      ctx: ExcaliburGraphicsContext,
      delta: number
    ) => {
      // custom drawing
    }
  }
}
Adding actors to the scene
For an Actor to be drawn and updated, it needs to be part of the "scene graph". The Engine provides several easy ways to quickly add/remove actors from the current scene.
const game   = new ex.Engine(...);
const player = new ex.Actor();
const enemy  = new ex.Actor();
// add them to the "root" scene
game.add(player);
game.add(enemy);
// start game
game.start();
You can also add actors to a Scene instance specifically.
const game = new ex.Engine()
const level1 = new ex.Scene()
const player = new ex.Actor()
const enemy = new ex.Actor()
// add actors to level1
level1.add(player)
level1.add(enemy)
// add level1 to the game
game.add('level1', level1)
// start the game
game.start()
// after player clicks start game, for example
game.goToScene('level1')
Collision Detection
By default Actors do not participate in collisions. If you wish to make an actor participate, you need to switch from the default prevent collision to active, fixed, or passive collision type.
ex.Physics.useRealisticPhysics();
ex.Physics.acc = ex.vec(0, 300);
const game = new ex.Engine({
    width: 600,
    height: 400,
    displayMode: ex.DisplayMode.FitScreen
});

const box = new ex.Actor({
    pos: ex.vec(game.halfDrawWidth, -100),
    width: 50,
    height: 50,
    rotation: Math.PI / 3,
    color: ex.Color.Red,
    collisionType: ex.CollisionType.Active
});

const trianglePoints = [ex.vec(-20, 20), ex.vec(0, -20), ex.vec(20, 20)];
const triangle = new ex.Actor({
    pos: ex.vec(game.halfDrawWidth, 100),
    rotation: Math.PI / 3,
    collider: new ex.PolygonCollider({points: trianglePoints}),
    collisionType: ex.CollisionType.Active
});
const triangleGraphic = new ex.Polygon({points: trianglePoints, color: ex.Color.Green});
triangle.graphics.use(triangleGraphic);

const circle = new ex.Actor({
    pos: ex.vec(game.halfDrawWidth + 20, -200),
    radius: 30,
    color: ex.Color.Yellow,
    collisionType: ex.CollisionType.Active
});

const ground = new ex.Actor({
    pos: ex.vec(game.halfDrawWidth, game.drawHeight),
    width: game.drawWidth,
    height: 100,
    color: ex.Color.DarkGray,
    collisionType: ex.CollisionType.Fixed
});
// start-snippet{collision}
game.start().then(() => {
    game.currentScene.add(box);
    game.currentScene.add(circle);
    game.currentScene.add(triangle);
    game.currentScene.add(ground);
    game.currentScene.camera.pos = ex.vec(game.halfDrawWidth, game.halfDrawHeight);
});