
Engine Fundamentals
Excalibur uses the HTML5 Canvas API for drawing your game to the screen.
The canvas is available to all draw functions for raw manipulation,
but Excalibur is meant to simplify or completely remove the need to use
the canvas directly.
Creating a game
To create a new game, create a new instance of Engine and pass in the configuration (EngineOptions). Excalibur only supports a single instance of a game at a time, so it is safe to use globally. You can then call start which starts the game and optionally accepts a Loader which you can use to load assets like sprites and sounds.
const game = new ex.Engine({
  width: 800, // the width of the canvas
  height: 600, // the height of the canvas
  canvasElementId: '', // the DOM canvas element ID, if you are providing your own
  displayMode: ex.DisplayMode.FitScreen, // the display mode
  pointerScope: ex.Input.PointerScope.Document, // the scope of capturing pointer (mouse/touch) events
})
// call game.start, which is a Promise
game.start().then(function () {
  // ready, set, go!
})
You would include your script (or bundle it) on an HTML page and that page does not need anything else.
<!DOCTYPE html>
<html>
  <head>
    <title>My Cool Game!</title>
  </head>
  <body>
    <script src="game.js"></script>
  </body>
</html>
Excalibur can automatically generate a <canvas> element for you or you can provide your own using EngineOptions.canvasElementId.
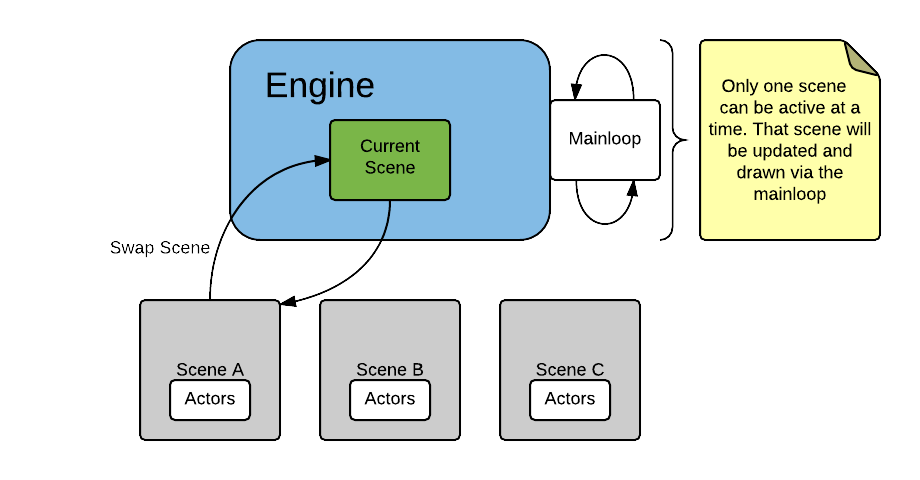
The main loop
The Excalibur engine uses a simple main loop. The engine updates and renders
the "scene graph" which is the scenes and the tree of actors within that
scene. Only one Scene can be active at a time. The engine does not update/draw any other
scene, which means any actors will not be updated/drawn if they are part of a deactivated scene.
Scene Graph
Engine
  |_ Scene 1 (activated)
    |_ Actor 1
      |_ Child Actor 1
    |_ Actor 2
  |_ Scene 2 (deactivated)
  |_ Scene 3 (deactivated)
The engine splits the game into two primary responsibilities: updating and drawing. This is to keep your game smart about splitting duties so that you aren't drawing when doing logic or performing logic as you draw.
Update loop
The first operation run is the Update loop. Actors and scenes both implement
an overridable/extendable onPreUpdate and onPostUpdate methods. Use them to perform any logic-based operations
in your game for a particular class.
Draw loop
The next step is the Draw loop. A scene loops through its child actors and
draws each one. You can override the onPreDraw and onPostDraw methods on an actor or scene to customize their drawing.
You should not perform any logic in a draw call, it should only relate to drawing.
Working with Scenes
The engine automatically creates a "root" Scene. You can use this for whatever you want.
You can manipulate scenes using add, remove,
and goToScene. You can overwrite or remove the root scene if
you want. There always has to be at least one scene and only one scene can be
active at any one time.
Learn more about the scene lifecycle.
Adding a scene
const game = new ex.Engine()
// create a new level
const level1 = new ex.Scene()
// add level 1 to the game
game.add('level1', level1)
// in response to user input, go to level 1
game.goToScene('level1')
// go back to main menu
game.goToScene('root')
Accessing the current scene
To add actors and other entities to the current scene, you can use add. Alternatively, you can use Engine.currentScene to directly access the current scene.
Constructor arguments
In Excalibur there are option bag constructors available on most types. These support any public property or member, methods are not supported. The API documentation does not provide an exhaustive list of possible properties but a list of commonly used properties.
For example instead of doing this:
const actor = new ex.Actor(1, 2, 100, 100, ex.Color.Red)
actor.body.collisionType = ex.CollisionType.Active
This is possible:
const options: ActorArgs = {
   pos: new ex.Vector(1,2);
   width: 100,
   height: 100,
   color: ex.Color.Red,
}

const actor = new ex.Actor(options);
actor.body.collisionType = ex.CollisionType.Active;
In fact you can create a duplicate this way
const actor = new ex.Actor({
  pos: new ex.Vector(1, 2),
})
const actorClone = new ex.Actor(actor)

expect(actor.pos).toBe(actorClone.pos) // true;
Types that support option bags can have their properties mass assigned using the assign method.
const actor = new ex.Actor(options)

actor.assign({
  pos: new ex.Vector(100, 100),
  width: 1000,
  color: ex.Color.Red,
})
Extending the engine
For complex games, any entity that inherits Class can be extended to override built-in functionality. This is recommended for actors and scenes, especially. You can customize the options or provide more for your game by extending Engine.
class Game extends ex.Engine {
  constructor() {
    super({ width: 800, height: 600, displayMode: DisplayMode.FitScreen })
  }

  public start() {
    // add custom scenes
    this.add('mainmenu', new MainMenu())
    return super.start(myLoader).then(() => {
      this.goToScene('mainmenu')
      // custom start-up
    })
  }
}
const game = new Game()
game.start()
Event handling
When working with events, be sure to keep in mind the order of subscriptions and try not to create a situation that requires specific things to happen in order. Events are best used for input events, tying together disparate objects, or for UI updates.
Excalibur events follow the convention that the name of the thrown event for listening will be the same as the Event object in all lower case with the 'Event' suffix removed.
For example:
- PreDrawEvent event object and "predraw" as the event name
actor.on('predraw', (evtObj: PreDrawEvent) => {
  // do some pre drawing
})
Example: Actor events
Actors implement an EventDispatcher (Actor.eventDispatcher) so they can
send and receive events. For example, they can enable Pointer events (mouse/touch)
and you can respond to them by subscribing to the event names.
You can also emit any other kind of event for your game just by using a custom
string value and implementing a class that inherits from GameEvent.
var player = new ex.Actor(...);

// Enable pointer events for this actor
player.enableCapturePointer = true;
// subscribe to pointerdown event
player.on("pointerdown", function (evt: ex.Input.PointerEvent) {
  console.log("Player was clicked!");
});
// turn off subscription
player.off("pointerdown");
// subscribe to custom event
player.on("death", function (evt) {
  console.log("Player died:", evt);
});
// trigger custom event
player.emit("death", new DeathEvent());
Example: Pub/Sub with Excalibur
You can also create an EventDispatcher for any arbitrary object, for example
a global game event aggregator (shown below as vent). Anything in your game can subscribe to
it, if the event aggregator is in the global scope.
Warning: This can easily get out of hand. Avoid this usage, it just serves as
an example.
// create a publisher on an empty object
var vent = new ex.EventDispatcher({})
// handler for an event
var subscription = function (event) {
  console.log(event)
}
// add a subscription
vent.on('someevent', subscription)
// publish an event somewhere in the game
vent.emit('someevent', new ex.GameEvent())
Managing game state
Excalibur does not provide any out-of-the-box way to manage game state but typically you can either use class properties or introduce something more sophisticated like a state machine.
The benefit of something like a state machine is that state can be separated from the actions an actor may take and you can then save and load state more easily to enable save game management. You could choose for example to have a global game state that you can serialize and deserialize.
Enabling debug mode
Call Engine.showDebug with a true or false to enable or disable Excalibur's debug feature. This will enable actor debug drawing to help diagnose drawing issues.