Scenes
Adding actors to the scene
For an Actor to be drawn and updated, it needs to be part of the "scene graph". The Engine provides several easy ways to quickly add/remove actors from the current scene.
const game   = new ex.Engine(...);
const player = new ex.Actor();
const enemy  = new ex.Actor();
// add them to the "root" scene
game.add(player);
game.add(enemy);
// start game
game.start();
You can also add actors to a scene instance specifically using Scene.add:
const game = new ex.Engine()
const level1 = new ex.Scene()
const player = new ex.Actor()
const enemy = new ex.Actor()
// add actors to level1
level1.add(player)
level1.add(enemy)
// add level1 to the game
game.add('level1', level1)
// start the game
game.start().then(() => {
  // after player clicks start game, for example
  game.goToScene('level1')
})
Scene lifecycle
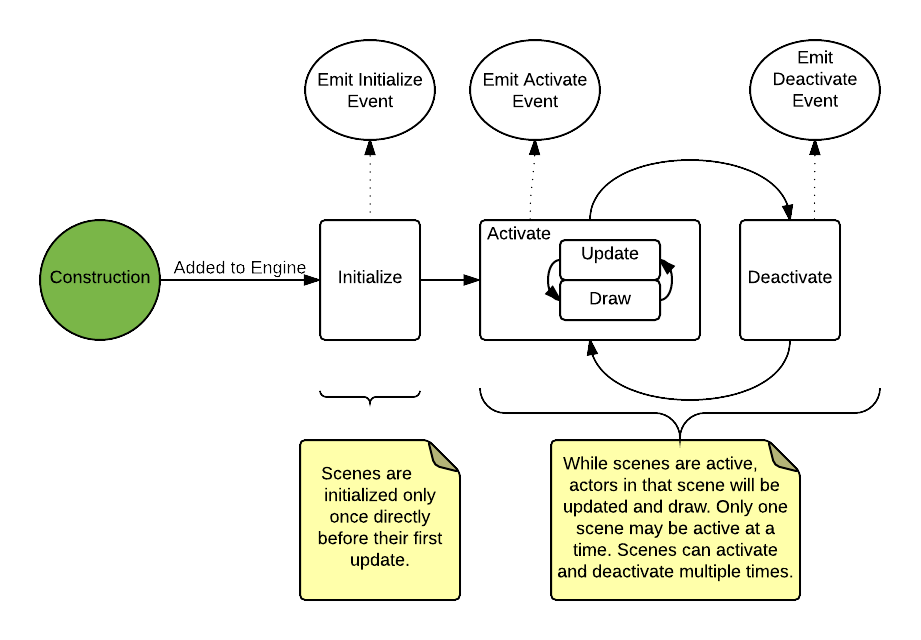
A scene has a basic lifecycle that dictates how it is initialized, updated, and drawn. Once a scene is added to the engine it will follow this lifecycle:

For more complex games, you might want more control over a scene in which case you can extend Scene. This is useful for menus, custom loaders, and levels.
Adding a scene
Use Engine.add to add a new scene to the game. Each scene has a string key you can assign. You can then use
Engine.goToScene to switch scenes which runs the scene lifecycle hooks.
class MainMenu extends ex.Scene {}
// add to game and activate it
game.add('mainmenu', new MainMenu())
game.goToScene('mainmenu')
Initialization
Scene.onInitialize is called once when the scene is created for use in the game. It is called before Scene.onActivate and can be used to set up the scene state. This is typically where you'd add any actors to the scene, set up initial state, and other startup tasks.
class MainMenu extends Scene {
  private _startButton: StartButton

  /**
   * Start-up logic, called once
   */
  public onInitialize(engine: Engine) {
    // initialize scene actors
    this._startButton = new StartButton()
    this.add(this._startButton)
  }
}
You can even call Engine.start to preload assets for your scene, to avoid having to load them at game initialization time:
class MainMenu extends Scene {
  private _loaded: boolean = false

  /**
   * Start-up logic, called once
   */
  public onInitialize(engine: Engine) {
    // load scene-specific assets
    engine.start(sceneLoader).then(() => {
      this._loaded = true
    })
  }
}
Activation
Scene.onActivate is called when the engine switches to the scene. It may be called more than once during the lifetime of a game, if you switch back and forth between scenes. It is useful for taking action before showing the scene. You may use this hook over onInitialize for anything specific to the context in which the scene was activated.
Data can be passed to a scene during activation via the goToScene('sceneKey', { some: 'data' }).
interface MyLevelData {
  spawnLocation: Vector
}

class MainMenu extends Scene<MyLevelData> {
  private startButton: StartButton

  /**
   * Each time the scene is entered (Engine.goToScene)
   */
  public onActivate(ctx: SceneActivationContext<MyLevelData>) {
    const { spawnLocation } = ctx.data
    console.log(spawnLocation)
    if (ctx.previousScene instanceof Level) {
      this.startButton.text = 'Resume game'
    } else {
      this.startButton.text = 'Start game'
    }
  }
}
Deactivation
Scene.onDeactivate is called when the engine exits a scene and is typically used for cleanup, exit tasks, and garbage collection.
class Level extends Scene {
  /**
   * Each time the scene is exited (Engine.goToScene)
   */
  public onDeactivate(ctx: SceneActivationContext) {
    this.saveState()
  }
}